Sunday 16 December 2012

Stdole2.tlb Excel 2007 Error

Manually Uninstall and Re-install Excel (please make sure you have the CD for Microsoft Office)
Step 1 – Make Excel unavailable
Make Excel Unavailable from Maintenance Mode
1. Click on Start > Control Panel.
2. Click on Classic view on the left Pane.
3. Double click on Programs and Features  
4. Click to select Microsoft Office 2007 or Microsoft Office Excel 2007 and click Change
5. Select "Add or Remove Features" and click Next.
6. Click to make excel unavailable

Backup the Registry
Note: Modifying REGISTRY settings incorrectly can cause serious problems that may prevent your computer from booting properly. Microsoft cannot guarantee that any problems resulting from the configuring of REGISTRY settings can be solved. Modifications of these settings are at your own risk.
1. Click on the Start > Run(Windows+R)
2. Type "regedit" (without quotes) in the run window, then press Enter.
3. within the Registry Editor Windows Click File and then Click Export.
4. Name your Backup something like Registry Backup, change Export Range to All, click Save.
5. Give your computer a moment to complete the task.

Delete "Excel" key from the following location in registry:
(If some keys can't be deleted or found, please skip them, this will not influence the result of the troubleshooting)
Click on the + sign to expand the registry keys, the keys following the backslash (\) are sub keys, right click on the last sub key and click Delete.
HKEY_CURRENT_USER\Software\Microsoft\Office\8.0\Excel
HKEY_CURRENT_USER\Software\Microsoft\Office\9.0\Excel
HKEY_CURRENT_USER\Software\Microsoft\Office\10.0\Excel
HKEY_CURRENT_USER\Software\Microsoft\Office\11.0\Excel
HKEY_CURRENT_USER\Software\Microsoft\Office\12.0\Excel
HKEY_CURRENT_USER\Software\Microsoft\Office\Excel
HKEY_LOCAL_MACHINE\SOFTWARE\Wow6432Node\Microsoft\Office\8.0\Excel
HKEY_LOCAL_MACHINE\SOFTWARE\Wow6432Node\Microsoft\Office\9.0\Excel
HKEY_LOCAL_MACHINE\SOFTWARE\Wow6432Node\Microsoft\Office\10.0\Excel
HKEY_LOCAL_MACHINE\SOFTWARE\Wow6432Node\Microsoft\Office\11.0\Excel
HKEY_LOCAL_MACHINE\SOFTWARE\Wow6432Node\Microsoft\Office\12.0\Excel
HKEY_LOCAL_MACHINE\SOFTWARE\Wow6432Node\Microsoft\Office\Excel
- Close the Registry Editor

Make Excel Available from Maintenance Mode
1. Click on Start > Control Panel.
2. Click on Classic view on the left Pane.
3. Double click on Programs and Features
4. Click to select Microsoft Office 2007 or Microsoft Office Excel 2007 and click Change
5. Select "Add or Remove Features" and click Next.
6. Click to check Excel and update the installation.
7. RESTART the computer.
Then try to open Excel and check.

I solve my problem by following above instructions

Ref:-http://answers.microsoft.com/en-us/office/forum/office_2007-office_install/stdole32tlb-file-missing/ba3e940d-d628-4334-ac89-5e8ac9878093 

And also check at
http://www.microsoftsupportchat.com/blog/post/Office-2007-Excel-stdole-32-tlb-error/
 

Monday 10 December 2012

Windows 7 Installation Error 0x80070017

Windows 7 Installation Error 0x80070017

This happens due to damage or problem with media (DVD or CD, DVD Rom,DVD R/W). If you have face like this problem then check you media like CD or DVD.if this has scratch then rewrite a new DVD or CD.other wise if you got problem again then replace DVD ROM,DVD R/W OR CD ROM.
You will be solve this problem because i have solve this by changing my DVD R/W.

Thursday 1 November 2012

expand a hard drive partition without formatting

We can increase or expand partition  of hard drive using tool many companies provided home addition free of cost .EaseUS has provided home edition is free this is very useful utility you can trust because i have also test it.

Free EaseUS® Partition Master 9.1.1 Home Edition Free Full  For Windows (Windows 2000 Professional, XP, Vista, Windows 7 SP1, Windows 8. (Support 32 and 64 bit) ONLY FOR HOME USER
(Ref.http://www.partition-tool.com/personal.htm)
Download
Download2

EaseUS® Partition Master 9.1.1 Professional Edition Demo Version For Windows (Windows 2000 Professional, XP, Vista, Windows 7 SP1, Windows 8. (Support 32 and 64 bit) DEMO VERSION

Downlaod 1
Downlaod 2
Download 3


EaseUS® Partition Master 9.1.1 Server Edition Demo Version For Server (Windows Server 2000, 2003, Home Server, 2008 R2 SP1, 2012 and Windows 2000, XP, Vista, Windows 7 SP1, Windows 8. (Support 32 and 64 bit) DEMO VERSION
Download 1
Download 2
Download 3

Please before use you have to read the specification given above reference link


Download Internet Explorer Free

Download internet explorer  Free for windows

Download Internet Explorer 7 Free (Ref. http://www.microsoft.com/en-us/download/details.aspx?id=2)

Internet Explorer 7 for Windows xp 32bit
Download

Download Internet Explorer 8 Free (Ref.http://www.microsoft.com/en-us/download/details.aspx?id=43)

Windows Internet Explorer 8 for Windows XP 32 bit 
Download1
Download2

Download Internet Explorer 9 Free(Ref. http://www.microsoft.com/en-us/download/details.aspx?id=13950)

Windows Internet Explorer 8 for Windows 7 x86 or 32 bit
Download 

You can get detail about specification or requirement of operating systems (windows) by visit at given reference Link

Sunday 28 October 2012

Full Antivirus Free Download

Today There is all over the world everybody use internet.and they want their data secure and there pc free from virus.So there is many companies which provide Full Antivirus Free .but there will be limited feature in free edition.you can download form link mention below.


  • Avira Free Full Antivirus (Ref: http://www.avira.com/en/avira-free-antivirus)
Download
  • Avg Free Full AntiVirus (Ref: http://free.avg.com/in-en/free-antivirus-download)
Download
  • Kaspersky Anti-Virus 2013 (Trial For 30 Days)
Download
  • Avira Antivirus Premium 2013 (Trial For 30 Days)
Download
  • Quick Heal AntiVirus Pro 2013 (Trial For 30 Days)
Download 1
Download 2

Windows Problems And Solutions

Problem 1.)PC did not show display but it is running or giving Beep Sound.
Solution. Turn off the PC and re-fix the ram into Motherboard

Problem 2.) PC getting restarted automatically
Solution. There are many reason for this problem
  • First there will be problem in SMPS
  • second there will be Problem in RAM
  • Third There will be Problem in HDD (BAD SECTOR)
  • Fourth There Will be Problem in Motherboard (Capacitor Problem) 

Problem 3.)
How to Create a Schedule Task in Windows
 Solution.
  • Go to Start-Programs-Accessories-System Tools-Schedule Task
  • Double click on Add Schedule Task
  • Click next and Select Task or Application in list
  • Select Option in Perform Task and Click Next
  • Enter User Name and Password
  • For Advance setting check the box open advance properties for this task
  • In Advance Setting You can set Time and other setting according to your need

Saturday 27 October 2012

Enable Disable Administrator Account windows 7

1. Open the Local Users and Groups manager by right click on my computer and select manage
2. In the left pane, click on the Users folder.
3. In the middle pane, right click on Administrator and click on Properties.
4. To Enable Administrator Account
  •  Uncheck the Account is disabled box.
5. To Disable Administrator Account 
  • Check the Account is disabled box. 
6. Click on OK.
7. Close the Local Users and Groups window.
8. Log off, and you will now see Administrator account log on icon added (if Uncheck the Account is disabled box enabled) or removed (if Check the Account is disabled box disabled) from the log on screen.

Friday 26 October 2012

Internet Explorer Or Any Browser Opens Too Many Windows

Some time Internet Explorer or any browser like Firefox,chrome opens too many windows.this problem occur due to virus you can fix this problem by visit link which is mention below

For check information
 http://www.symantec.com/security_response/writeup.jsp?docid=2010-090608-3309-99

For download Tool By symantec
FixTDSS.exe click here

I have fix my problem by using this software.you have to download a .exe file from that link and scan your PC after that your PC got restarted and your problem will solve.


Thursday 25 October 2012

System Progressive Protection Virus Removal Guide

System Progressive Protection Virus Removal Instructions manually.

  • You can remove this System Progressive Protection Virus manually by following simple step.
  • First restart the computer 
  • run windows in safe mode by pressing F8 key on keyboard many times
  • click on start and run
  • type msconfig and click on startup 
  • lookup System Progressive Protection Virus registry or unknown registry or unknown software path
  • then go to that location it may be local setting\application data 
  • delete that folder then again click on start and run
  • type regedit and press ok
  • goto edit menu and click on find
  • type  System Progressive Protection and click on find next you have find again and again till the message does not appear nothing found etc because there will be many entry of this virus in registry
  • delete all registry which is related to System Progressive Protection but before do this take your data and registry backup
  • delete all Temporary file in temp folder and internet temporary file and restart the PC

Problem in Windows "Registry Disabled By Administrator"

Sometime A problem in windows occur when we try to open registry using regedit command. it show a pop up window that "Registry Disabled By Administrator".this problem can occur due to virus attack.the solution of this problem mention below.How to enable registry disabled by administrator.


  • Click Start, click Run
  • Type gpedit.msc in the Open box, and then click OK.
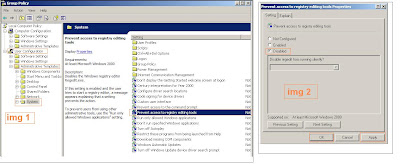
  • Expand User Configuration, Administrative Templates, and System, (Ref Img1)
  • Then click Prevent access to registry editing tools.in the right side (Ref.Img2)
  • Click to select disabled and Click apply and ok. (Ref.Img2)

Increase Your Internet Speed In Windows XP

In windows you can increase your internet speed follow below step but it will make a little bit changes in your speed.


  • Click START, then click RUN.
  • Type "gpedit.msc" without the quotes, then click OK.


  • Browse to the highlighted area shown in img 1 and img 2 -- click Computer Configuration/ Administrative Templates/ Network/ QoS Packet Scheduler 
  • in the left-hand pane (shown in img1) then double-click "Limit reservable bandwith" in the right-hand pane. 
  • The dialog box shown below will pop up.(Ref Img2)
  • Click the dot (radio button Follow the step 1-4) for Enabled as shown below, 
  • in Bandwidth Limit, type or click up or down until a number between 0 and 10 is shown.
  • Click Apply,(Ref.Img2 follow the step 1-4) and ok
  •  after that Click START, then click RUN
  • type gpupdate /force press ok or restart the pc

Wednesday 24 October 2012

Task Manager Disabled By Administrator Or Enable/Disable Task Manager in windows

Problem. Sometime a problem in windows occur when we press Ctrl+Alt+Del for open task manger it show popup that Task Manager Disabled By Adminstrator.
Soluiton. how to enable/disable  task manager
Method 1.
  • First press windows+run
  • then type gpedit.msc and press ok
  • then go to user configuration
  • then go to administrative templates
  • then got to system and click on Ctrl+Alt+Del option
  • right side of the windows double click on remove task manager
  • set to disable and click on apply and ok (by doing this task manager will work)
  • set to enable and click on apply and ok (by doing this task manager will not work)
  • press windows+run and type gpupdate /force and press ok or restart PC
 Method 2.
Warning: Modifying your registry can cause serious problems that may require you to reinstall your operating system.
                Always backup your registry before doing this registry edit and backup your pc data 

Verity correct registry settings::
  •  Go to "Start" -> "Run" -> Write "regedit" and press on "Enter" button.
  •  Navigate to the following registry keys and verity that following settings set to default:
  • Windows Registry Editor Version 5.00
  • [HKEY_CURRENT_USER\Software\Microsoft\Windows\CurrentVersion\Policies\System]
  • "DisableTaskMgr"=dword:00000000
  • [HKEY_CURRENT_USER\Software\Microsoft\Windows\CurrentVersion\Group Policy Objects\LocalUser\Software\Microsoft\Windows\CurrentVersion\Policies\System]
  • "DisableTaskMgr"=dword:00000000
  • [HKEY_LOCAL_MACHINE\SOFTWARE\Microsoft\Windows\CurrentVersion\policies\system\]
  • "DisableTaskMgr"=dword:00000000
  • [HKEY_LOCAL_MACHINE\SOFTWARE\Microsoft\Windows NT\CurrentVersion\Winlogon]
  • "DisableCAD"=dword:00000000
  •  Reboot the computer.

Problems in Windows networking PC Ethernet card connected to net work but not work


Problem.1) Some time a problem occur in networking PC Ethernet card cable show connect but it did not work in windows
Solution. Many there some pair of network Cable not work or your ethernet card or lan card not work on auto-negotiations speed you have to follow this step
  • Double Click on ethernet card
  • then clich on properties
  • then click on configure
  • then click on advanced
  • then click on speed/duplex settings
  • then set value by scrolling down to auto-negotiations 10 HD(half duplex) note this will set your ethernet speed to 10 MB/per second


Tuesday 23 October 2012

In Windows 7 getting problem of Moniter Frequency

Solution For getting problem of moniter frequeny problem in windows 7
Caution of problem is due to VGA driver incompatibility with windows or virus attack
  • First run windows in safe mode
  • Then open Device Manger
  • Uninstall Display Adapter Driver 
  • Install Display Adapter Driver and update driver to Standard VGA Driver which has in windows by default
  • restart Windows

Thursday 18 October 2012

Solution for "Operation could not be completed. Either the printer name was typed incorrectly, or the specified printer has lost its connection to the server"in windwos

  • in windows First, check if the "Print Spooler / Spooler" service is up and running on the remote computer.
  • If this is already the case, and if the computer runs Windows 2003 Server or higher OS, check in the Group Ploicy Editor if the print spooler accepts remote client connections. Follow these steps:
  • Start  command prompt, Execute, "gpedit.msc"
  • Browse to "Computer Configuration" / "Administrative Templates" / "Printers".
  • In the right pane, double-clic on the policy"Allow Print Spooler to accept client connections".
  • Enable this setting, then Apply.
  • Then restart on the remote computer the "Print Spooler / Spooler" service in order to take changes into account.or restart computer

Monday 10 September 2012

#1045 - access denied for user 'root'@'localhost' (using password no)" Solution for Joomla

Dear Friends,
If in windows using joomla you got problem of error #1045 - access denied for user 'root'@'localhost' (using password no) on running Php My admin in XAMPP.Then follow below step you will be able to solve this because i have also do this and my porblem get solved.

1.First Stop XAMPP

2. Goto to directory in which XAMPP has installed for example c:\xampp.

3. Then goto c:\xampp\mysql.


4. Run resetroot.bat .

5.Restart the PC and Enjoy.

Command For Find Port Used By Application On Computer in windows

Dear Friends,
There is many application running on windows on local or  network.These application use some port of windows.Here we find the port of application used by Following these steps.
Image 1
1. Open Command Prompt.
2. Type netstat -aon.(See Image 1)
3. Press Enter.

4. This show you port which is use a PID Number.
5. Then Note down PID Number using By Port Which You Want.
6. Now open TASK MANAGER by press ALT+CTRL+DELETE.
Image 2
7. Click on Process Tab (See Image 2).
8. Click On View and Select Columns. (See Image 2).
9. Then Click on PID Tick in the box.then ok.

10. after that see Task Manager.It show PID infront of application or image name.
11. you can End Process of that application which port used by.


Like this you will be able to find port used by application.

Saturday 25 August 2012

Windows 7 Network Password Problem And Solution

Image 1
Windows7 use Security Advance Level, So that it is ask for network password after enter a network computer user name and password.For this solution you have a simple few step to close network password option.
1.First open Control Panel

2.Find Administrative Tool and open it

3.Then open Local Security Policy which is show in image1

Image 2


4.Go to Security Setting

5.open Local Policy (See imgae 2)

6.Click On Security Option (see image 2)

7.Find Network Security: LAN Manager        authentication Level which show not define,Double    click on it.(See Image2)


Image 3

8.Click On drop Down List

9.Select Sent NTLM response Only (See Image3)


10.Click Apply and Ok (See Image 3)


Image 4

11.Open Command Prompt

12.Type Command gpupdate /force press Enter

Restat Computer And Enjoy!!!!!!!!!!

Turbocharge Windows 7: Use Your USB Drive as Extra RAM

Friday 24 August 2012

PREVENT PEN DRIVE FROM VIRUSES IN WINDOWS

Friends many of your PC/laptop's normally gets virus because of Pen Drives or USB devices (Even PC's who are not connected to network ). Some Virus like Ravmon Virus , Heap41a worm which are not detected by anti virus normally spreads mostly by the Pen Drives . In such a case what can you do to prevent your PC from getting infected with Virus that spreads through USB devices or Pen Drives ?
You can protect your PC by just following the simple steps below . It won't take much time.

Connect your Pen Drive or USB drive to your computer .
Now a dialogue window will popup asking you to choose among the options as shown in the figure.
Don't choose any of them , Just simply click Cancel.

*Now go to Start--> Run and type cmd to open the Command Prompt window .

*Now go to My Computer and Check the Drive letter of your USB drive or Pen Drive.
( E.g. If it is written Kingston (I), then I: will be the drive letter .)

*In the Command Window ( cmd ) , type the drive letter: and Hit Enter .

*Now type dir/w/o/a/p and Hit Enter

*You will get a list of files . In the list , search if anyone of the following do exist

1. Autorun.inf

2. New Folder.exe

3. Bha.vbs

4. Iexplore.vbs

5. Info.exe
6. New_Folder.exe

7. Ravmon.exe
8. RVHost.exe or any other files with .exe Extension .

If you find any one of the files above , Run the command attrib -h -r -s -a *.* and Hit Enter.

Now Delete each File using the following Command del filename ( E.g del autorun.inf ) .

That's it .Now just scan your USB drive with the anti virus you have to ensure that you made your Pen
Drive free of Virus .

This virus is very very common now...
To know whether ur system is infected just type C:\heap41a in the address bar...
if there is a folder named heap41a, then ur system is infected...
(AVAST antivirus is the best solution for this worm...) symantec also works.

Create Icon for Shutdown In windows

Right click on a open area of the Desktop ,
select New / shortcut enter in “shutdown -s -t 00”-no quotes,
press the next button & give name & click finish**********

Increase System Performance of Windows

Increase System Perfomance------->
Start Regedit- Goto HKEY_LOCAL_MACHINE \ SYSTEM \Current control set \ control \ session manager \ Memory management \ disable paging executive.
Set the value to be -1,
Reboot the Computer... **********

To Change Your Drive Letters in Windows

Start->Control Panel ->Administrative tools->Computer Management,
Disk Management then Right Click the partition whose name you want to change (Click in the white area just below the word “Volume”) & select change drive letters & paths. Here After you can change the drive letters ************ 

In Windows Lock a Folder without any Software

Lock a Folder without any Software :---->If you want to lock ur folder Eg:Named “abc” in ur C drive.
1. Open Command Prompt
2. Type attrib +s+h C:\abc & press enter .
This command will make ur folder invisible & it can’t be seen even in hidden files & folders.
3.To make it visible again type attrib –s-h C:\abc in ur command prompt.
**********

Test Wheather your AntiVirus is Protecting your PC or Not

1.) Open Notepad & paste this X50!P%@AP[4\PZX54(P^)7CC)7}EICAR-STANDARD-ANTIVIRUS-TEST-FILE!$H+H*
2.) Save it as eicar.com The AntiVirus should stop you (if it does that means its working). ***********

Speed up ur Windows or to increase RAM virtually

Right click on My Computer ->Properties->Advanced->Performance settings->Advanced-> Virtual Memory – Change the initial size same as recommended & max. size double of it Then restart ur system.
It will improve speed of Windows & u can play some Games which require higher RAM.
Right click on My Computer ->Properties->Advanced->Performance settings->Advanced-> Virtual Memory – Change the initial size same as recommended & max. size double of it then restart ur system.
It will improve speed of Windows & u can play some Games which require higher RAM. ***********


keyboard Shortcuts of Windows XP

General keyboard shortcuts

CTRL+C (Copy)
CTRL+X (Cut)
CTRL+V (Paste)
CTRL+Z (Undo)
DELETE (Delete)
SHIFT+DELETE (Delete the selected item permanently without placing the item in the Recycle Bin)
CTRL while dragging an item (Copy the selected item)
CTRL+SHIFT while dragging an item (Create a shortcut to the selected item)
F2 key (Rename the selected item)
CTRL+RIGHT ARROW (Move the insertion point to the beginning of the next word)
CTRL+LEFT ARROW (Move the insertion point to the beginning of the previous word)
CTRL+DOWN ARROW (Move the insertion point to the beginning of the next paragraph)
CTRL+UP ARROW (Move the insertion point to the beginning of the previous paragraph)
CTRL+SHIFT with any of the arrow keys (Highlight a block of text)
SHIFT with any of the arrow keys (Select more than one item in a window or on the desktop, or select text in a document)
CTRL+A (Select all)
F3 key (Search for a file or a folder)
ALT+ENTER (View the properties for the selected item)
ALT+F4 (Close the active item, or quit the active program)
ALT+ENTER (Display the properties of the selected object)
ALT+SPACEBAR (Open the shortcut menu for the active window)
CTRL+F4 (Close the active document in programs that enable you to have multiple documents open simultaneously)
ALT+TAB (Switch between the open items)
ALT+ESC (Cycle through items in the order that they had been opened)
F6 key (Cycle through the screen elements in a window or on the desktop)
F4 key (Display the Address bar list in My Computer or Windows Explorer)
SHIFT+F10 (Display the shortcut menu for the selected item)
ALT+SPACEBAR (Display the System menu for the active window)
CTRL+ESC (Display the Start menu)
ALT+Underlined letter in a menu name (Display the corresponding menu)
Underlined letter in a command name on an open menu (Perform the corresponding command)
F10 key (Activate the menu bar in the active program)
RIGHT ARROW (Open the next menu to the right, or open a submenu)
LEFT ARROW (Open the next menu to the left, or close a submenu)
F5 key (Update the active window)
BACKSPACE (View the folder one level up in My Computer or Windows Explorer)
ESC (Cancel the current task)
SHIFT when you insert a CD-ROM into the CD-ROM drive (Prevent the CD-ROM from automatically playing)
CTRL+SHIFT+ESC (Open Task Manager)

Dialog box keyboard shortcuts

If you press SHIFT+F8 in extended selection list boxes, you enable extended selection mode. In this mode, you can use an arrow key to move a cursor without changing the selection. You can press CTRL+SPACEBAR or SHIFT+SPACEBAR to adjust the selection. To cancel extended selection mode, press SHIFT+F8 again. Extended selection mode cancels itself when you move the focus to another control.
CTRL+TAB (Move forward through the tabs)
CTRL+SHIFT+TAB (Move backward through the tabs)
TAB (Move forward through the options)
SHIFT+TAB (Move backward through the options)
ALT+Underlined letter (Perform the corresponding command or select the corresponding option)
ENTER (Perform the command for the active option or button)
SPACEBAR (Select or clear the check box if the active option is a check box)
Arrow keys (Select a button if the active option is a group of option buttons)
F1 key (Display Help)
F4 key (Display the items in the active list)
BACKSPACE (Open a folder one level up if a folder is selected in the Save As or Open dialog box)

Microsoft natural keyboard shortcuts

Windows Logo (Display or hide the Start menu)
Windows Logo+BREAK (Display the System Properties dialog box)
Windows Logo+D (Display the desktop)
Windows Logo+M (Minimize all of the windows)
Windows Logo+SHIFT+M (Restore the minimized windows)
Windows Logo+E (Open My Computer)
Windows Logo+F (Search for a file or a folder)
CTRL+Windows Logo+F (Search for computers)
Windows Logo+F1 (Display Windows Help)
Windows Logo+ L (Lock the keyboard)
Windows Logo+R (Open the Run dialog box)
Windows Logo+U (Open Utility Manager)

Accessibility keyboard shortcuts

Right SHIFT for eight seconds (Switch FilterKeys either on or off)
Left ALT+left SHIFT+PRINT SCREEN (Switch High Contrast either on or off)
Left ALT+left SHIFT+NUM LOCK (Switch the MouseKeys either on or off)
SHIFT five times (Switch the StickyKeys either on or off)
NUM LOCK for five seconds (Switch the ToggleKeys either on or off)
Windows Logo +U (Open Utility Manager)

Windows Explorer keyboard shortcuts

END (Display the bottom of the active window)
HOME (Display the top of the active window)
NUM LOCK+Asterisk sign (*) (Display all of the subfolders that are under the selected folder)
NUM LOCK+Plus sign (+) (Display the contents of the selected folder)
NUM LOCK+Minus sign (-) (Collapse the selected folder)
LEFT ARROW (Collapse the current selection if it is expanded, or select the parent folder)
RIGHT ARROW (Display the current selection if it is collapsed, or select the first subfolder)

Shortcut keys for Character Map

After you double-click a character on the grid of characters, you can move through the grid by using the keyboard shortcuts:
RIGHT ARROW (Move to the right or to the beginning of the next line)
LEFT ARROW (Move to the left or to the end of the previous line)
UP ARROW (Move up one row)
DOWN ARROW (Move down one row)
PAGE UP (Move up one screen at a time)
PAGE DOWN (Move down one screen at a time)
HOME (Move to the beginning of the line)
END (Move to the end of the line)
CTRL+HOME (Move to the first character)
CTRL+END (Move to the last character)
SPACEBAR (Switch between Enlarged and Normal mode when a character is selected)

Microsoft Management Console (MMC) main window keyboard shortcuts

CTRL+O (Open a saved console)
CTRL+N (Open a new console)
CTRL+S (Save the open console)
CTRL+M (Add or remove a console item)
CTRL+W (Open a new window)
F5 key (Update the content of all console windows)
ALT+SPACEBAR (Display the MMC window menu)
ALT+F4 (Close the console)
ALT+A (Display the Action menu)
ALT+V (Display the View menu)
ALT+F (Display the File menu)
ALT+O (Display the Favorites menu)

MMC console window keyboard shortcuts

CTRL+P (Print the current page or active pane)
ALT+Minus sign (-) (Display the window menu for the active console window)
SHIFT+F10 (Display the Action shortcut menu for the selected item)
F1 key (Open the Help topic, if any, for the selected item)
F5 key (Update the content of all console windows)
CTRL+F10 (Maximize the active console window)
CTRL+F5 (Restore the active console window)
ALT+ENTER (Display the Properties dialog box, if any, for the selected item)
F2 key (Rename the selected item)
CTRL+F4 (Close the active console window. When a console has only one console window, this shortcut closes the console)

Remote desktop connection navigation

CTRL+ALT+END (Open the Microsoft Windows NT Security dialog box)
ALT+PAGE UP (Switch between programs from left to right)
ALT+PAGE DOWN (Switch between programs from right to left)
ALT+INSERT (Cycle through the programs in most recently used order)
ALT+HOME (Display the Start menu)
CTRL+ALT+BREAK (Switch the client computer between a window and a full screen)
ALT+DELETE (Display the Windows menu)
CTRL+ALT+Minus sign (-) (Place a snapshot of the entire client window area on the Terminal server clipboard and provide the same functionality as pressing ALT+PRINT SCREEN on a local computer.)
CTRL+ALT+Plus sign (+) (Place a snapshot of the active window in the client on the Terminal server clipboard and provide the same functionality as pressing PRINT SCREEN on a local computer.)

Microsoft Internet Explorer navigation

CTRL+B (Open the Organize Favorites dialog box)
CTRL+E (Open the Search bar)
CTRL+F (Start the Find utility)
CTRL+H (Open the History bar)
CTRL+I (Open the Favorites bar)
CTRL+L (Open the Open dialog box)
CTRL+N (Start another instance of the browser with the same Web address)
CTRL+O (Open the Open dialog box, the same as CTRL+L)
CTRL+P (Open the Print dialog box)
CTRL+R (Update the current Web page)
CTRL+W (Close the current window)

Ref.-.http://support.microsoft.com/kb/301583

Disable And Enable Mass Storage Or Pen Drive In Registry In Windows

Image 1
To Disable Or Enable Usb Pen Drive and Mass Storage Without Using Software Through Registry.
 1) First goto RUN Prompt

2) Type Regedit

3) Then Click On HKEY_LOCAL_MACHINE (See Image1)


4) After That Click on Sub Key SYSTEM (See Image1)

5) Then Click On Sub Key  CurrentControlSet  (See Image1)


6) Then Click on Sub Key below  Services  (See Image1)


Image 2

7) Then Find Bleow USBSTOR and Click On it


8) See right side window double click on Image Path (As show in Image 2)

9) change value data system32\DRIVERS\USBSTOR.SYS to system32\DRIVERS\USBSTOR1.SYS and press ok (see image3)

It will disable the Mass storage and Usb Pen drive

Image 3
Remember one thing before do this Please note old value data of Image Path

For Enable  the Mass storage and Usb Pen drive


Put the old value data of image path (As shown  in image2)
do step show upper  1-8 after that
10)  change value data system32\DRIVERS\USBSTOR1.SYS to system32\DRIVERS\USBSTOR.SYS

It will Enable the Mass storage and Usb Pen drive again.


Enjoy!!!!!!!!!!! GOOD LUCK!!!!!!!!!